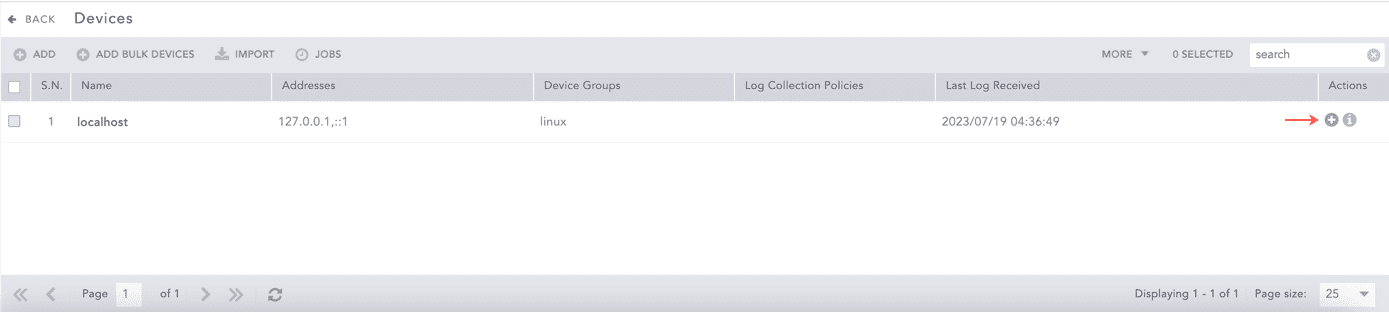
Go to Settings >> Configuration from the navigation bar and click Devices.
Click the Add Collectors/Fetchers ( ) icon from Actions of the localhost device.
Adding Fetchers in a Device
Click Vulnerability Management.
Select Tenable.sc.
Click Add.
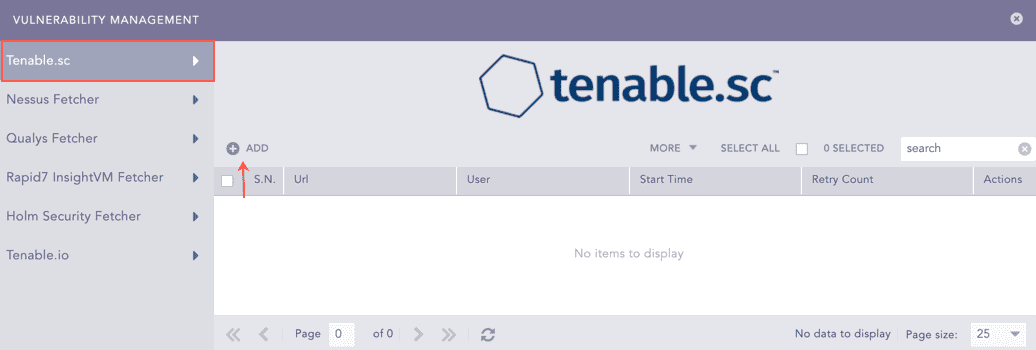
Vulnerability Management
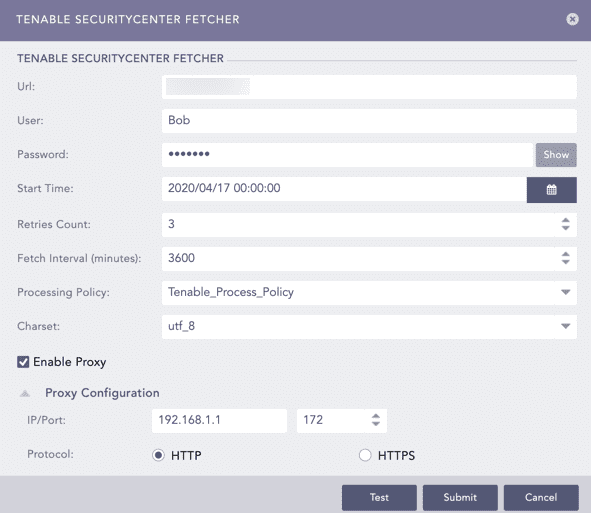
Enter the Url of the host machine where Tenable.sc is configured.
Enter Tenable.sc User and the Password.
Select a Start Time from when all the SecurityCenter reports will be fetched.
Enter the number of Retries Count. It is the number of times a vulnerability scan was attempted and failed. It is three by default with a maximum limit of five.
Enter the Fetch Interval in minutes.
Select a Processing Policy.
Select a Charset.
Click Test to check whether the fetcher configuration is working correctly.
Select Enable Proxy to use a proxy server.
In Proxy Configuration:
12.1. Enter the proxy server IP address and the Port number.
12.2. Select either HTTP or HTTPS protocol.
Click Submit.
Configuring Tenable.sc Fetcher
Select Nessus Fetcher.
Click Add.

Vulnerability Management
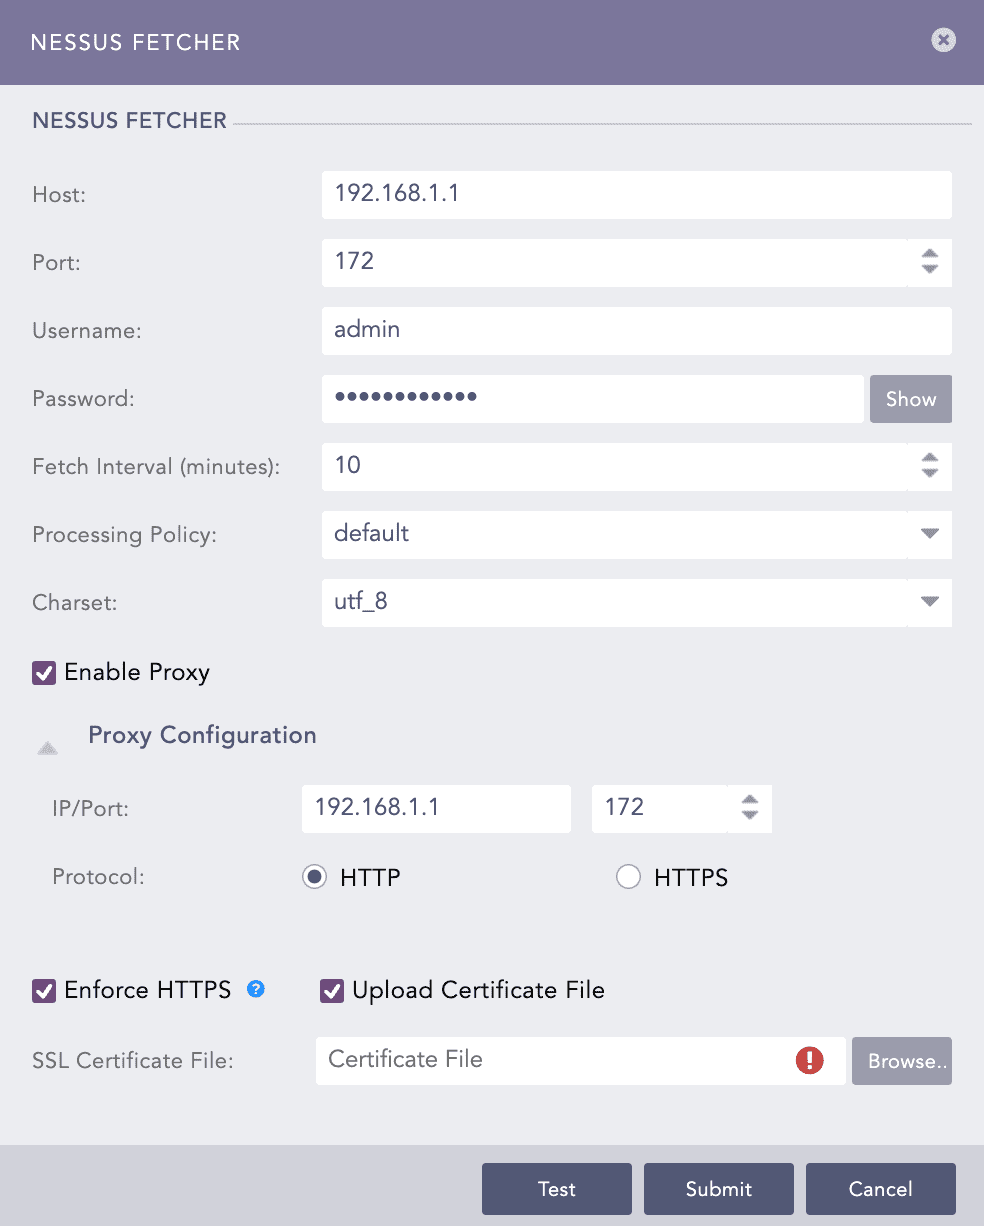
Enter the Host URL or IP address of the host machine where Nessus is configured.
Enter the Port of the Nessus configured host machine.
Enter the Nessus Username and Password.
Enter a Fetch Interval in minutes.
Select a Processing Policy.
Select a Charset.
Click Test to check whether the fetcher configuration is working correctly.
Select Enable Proxy to use a proxy server.
In Proxy Configuration:
11.1. Enter the proxy server IP address and the Port number.
11.2. Select either HTTP or HTTPS protocol.
Select Enforce HTTPS to enable a secure connection.
If the server has a Self Signed Certificate, you can add an SSL Certificate File. Select Upload Certificate File.
13.1. Click Browse to select a certificate file in PEM format (.pem) or PEM-encoded .crt format. An SSL certificate enables an encrypted connection between the server and Logpoint.
Click Submit.
Configuring Nessus Fetcher
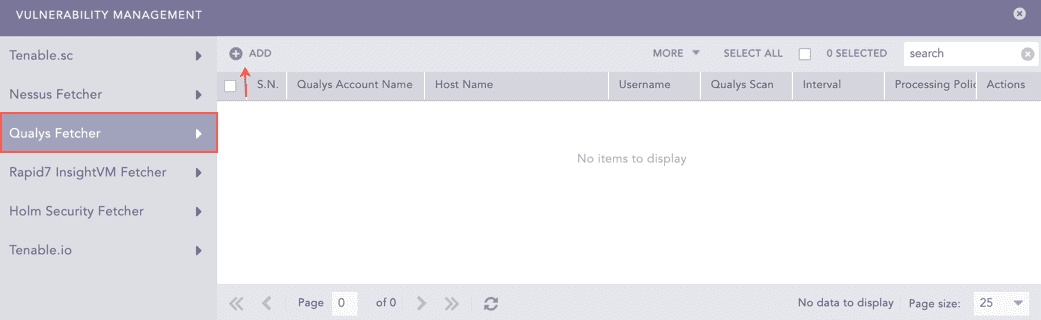
Select Qualys Fetcher.
Click Add.
Vulnerability Management
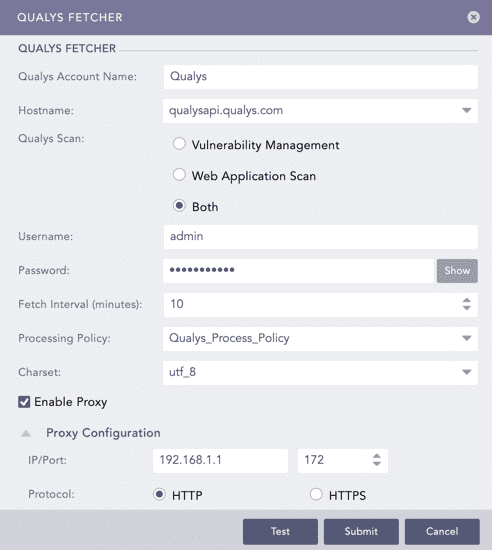
Enter the Qualys Account Name.
Enter the Hostname URL or IP address of the host machine where Qualys is configured.
Select the Qualys Scan type.
Enter the Qualys Username and Password.
Enter the Fetch Interval in minutes.
Select a Processing Policy.
Select a Charset.
Click Test to check whether the fetcher configuration is working correctly.
Select Enable Proxy to use a proxy server.
In Proxy Configuration:
12.1. Enter the proxy server IP address and the Port number.
12.2. Select either HTTP or HTTPS protocol.
Click Submit.
Configuring Qualys Fetcher
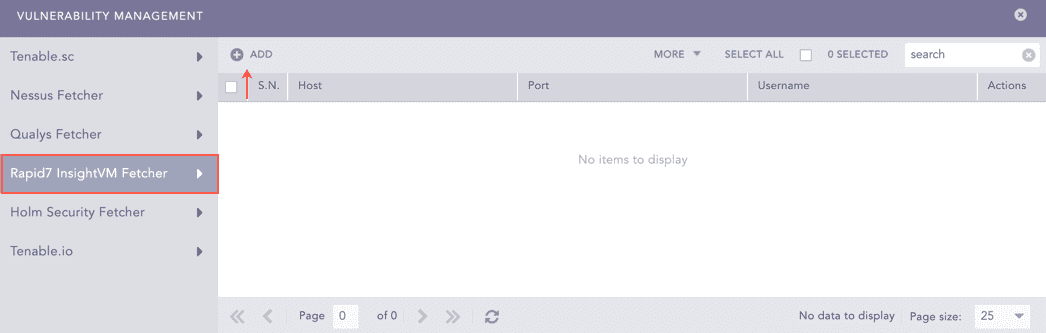
Select Rapid7 InsightVM Fetcher.
Click Add.
Vulnerability Management
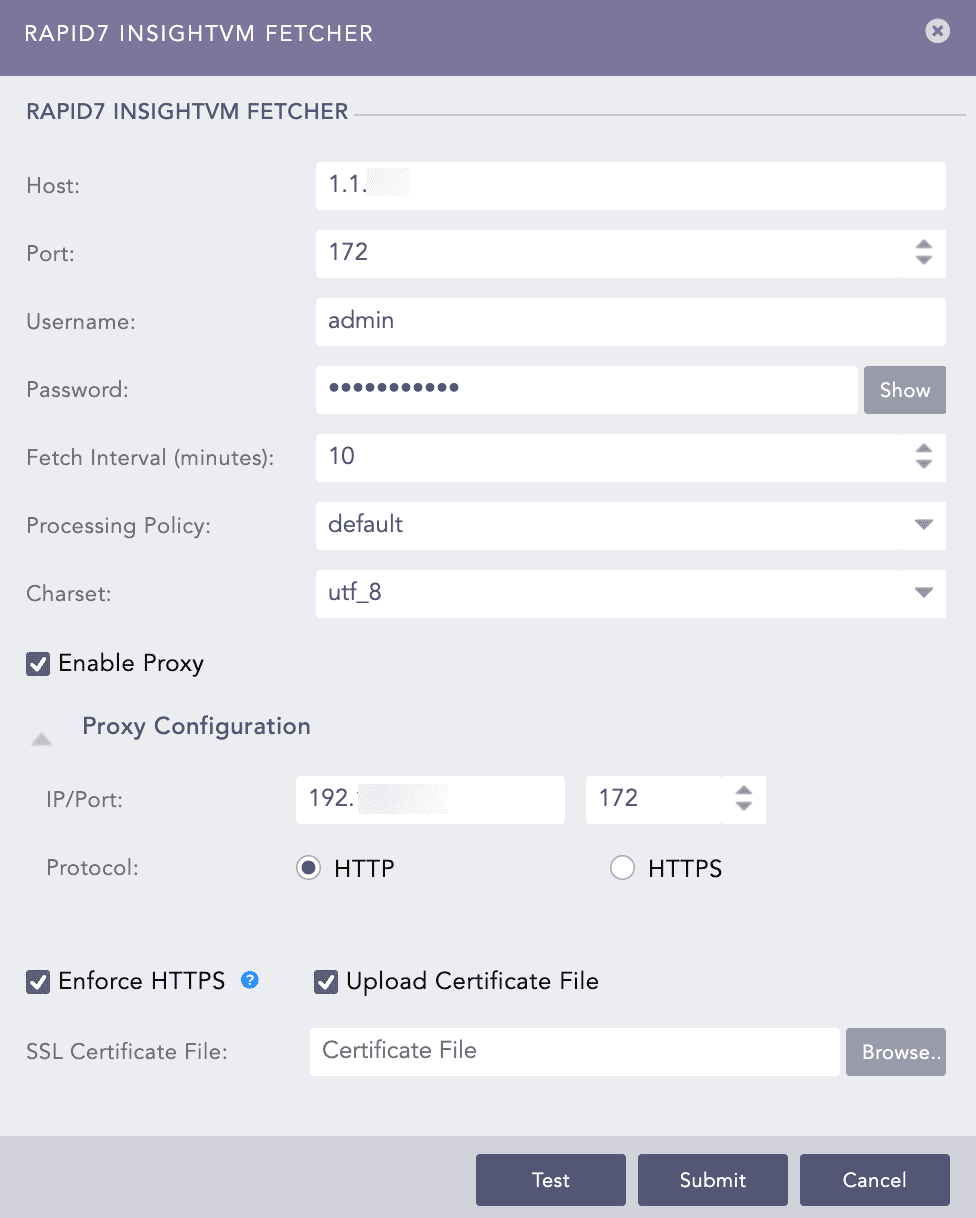
Enter the Host URL or IP address of the host machine where you have Rapid7 InsightVM configured.
Enter the Port of the Rapid7 InsightVM configured host machine.
Enter the Rapid7 InsightVM Username and Password.
Enter the Fetch Interval in minutes.
Select a Processing Policy.
Select a Charset.
Click Test to check whether the fetcher configuration is working correctly.
Select Enable Proxy to use a proxy server.
In Proxy Configuration:
11.1. Enter the proxy server IP address and the Port number.
11.2. Select either HTTP or HTTPS protocol.
Select Enforce HTTPS to enable a secure connection.
If the server has a Self Signed Certificate, you can add an SSL Certificate File. Select Upload Certificate File.
13.1. Click Browse to select a certificate file in PEM format (.pem) or PEM-encoded .crt format. An SSL certificate enables an encrypted connection between the server and Logpoint.
Click Submit.
Configuring Rapid7 InsightVM Fetcher
To configure the Holm Security Fetcher in Logpoint, you must first obtain the base URL of API and API token from the Holm Security portal.
Go to the Holm Security Portal and enter your credentials.
Click the Menu icon at the right hand side of the page.
Click </> API. You can find the Base URL of API under API endpoint.
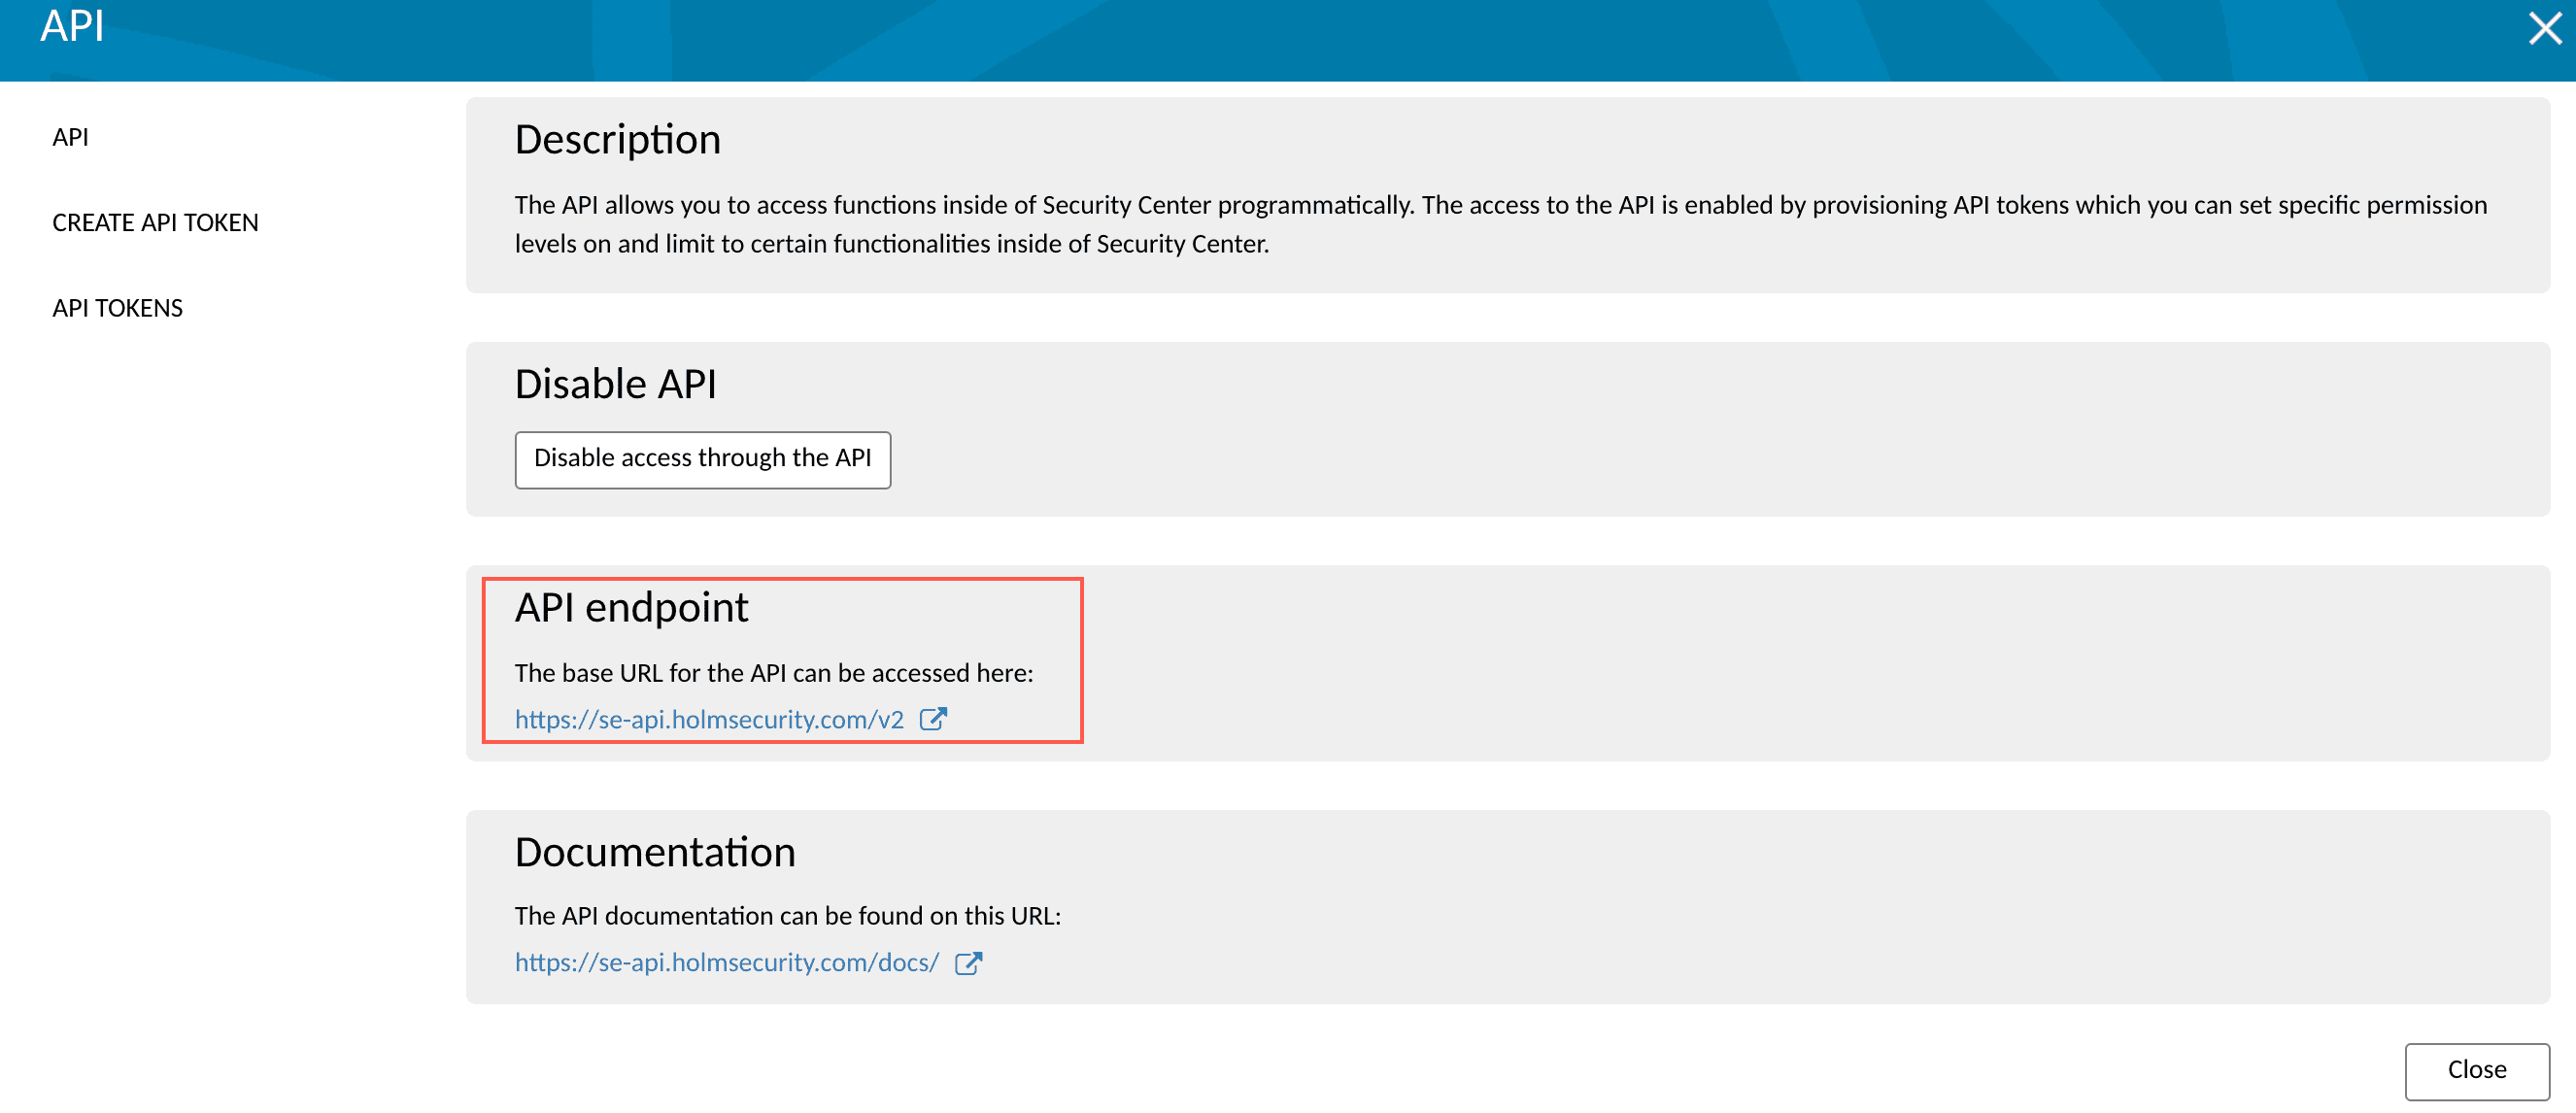
Base URL of API
Click Create API TOKEN.
Enter a Name for the token.
Select Permissions and Access areas for the token.
Click Create token.
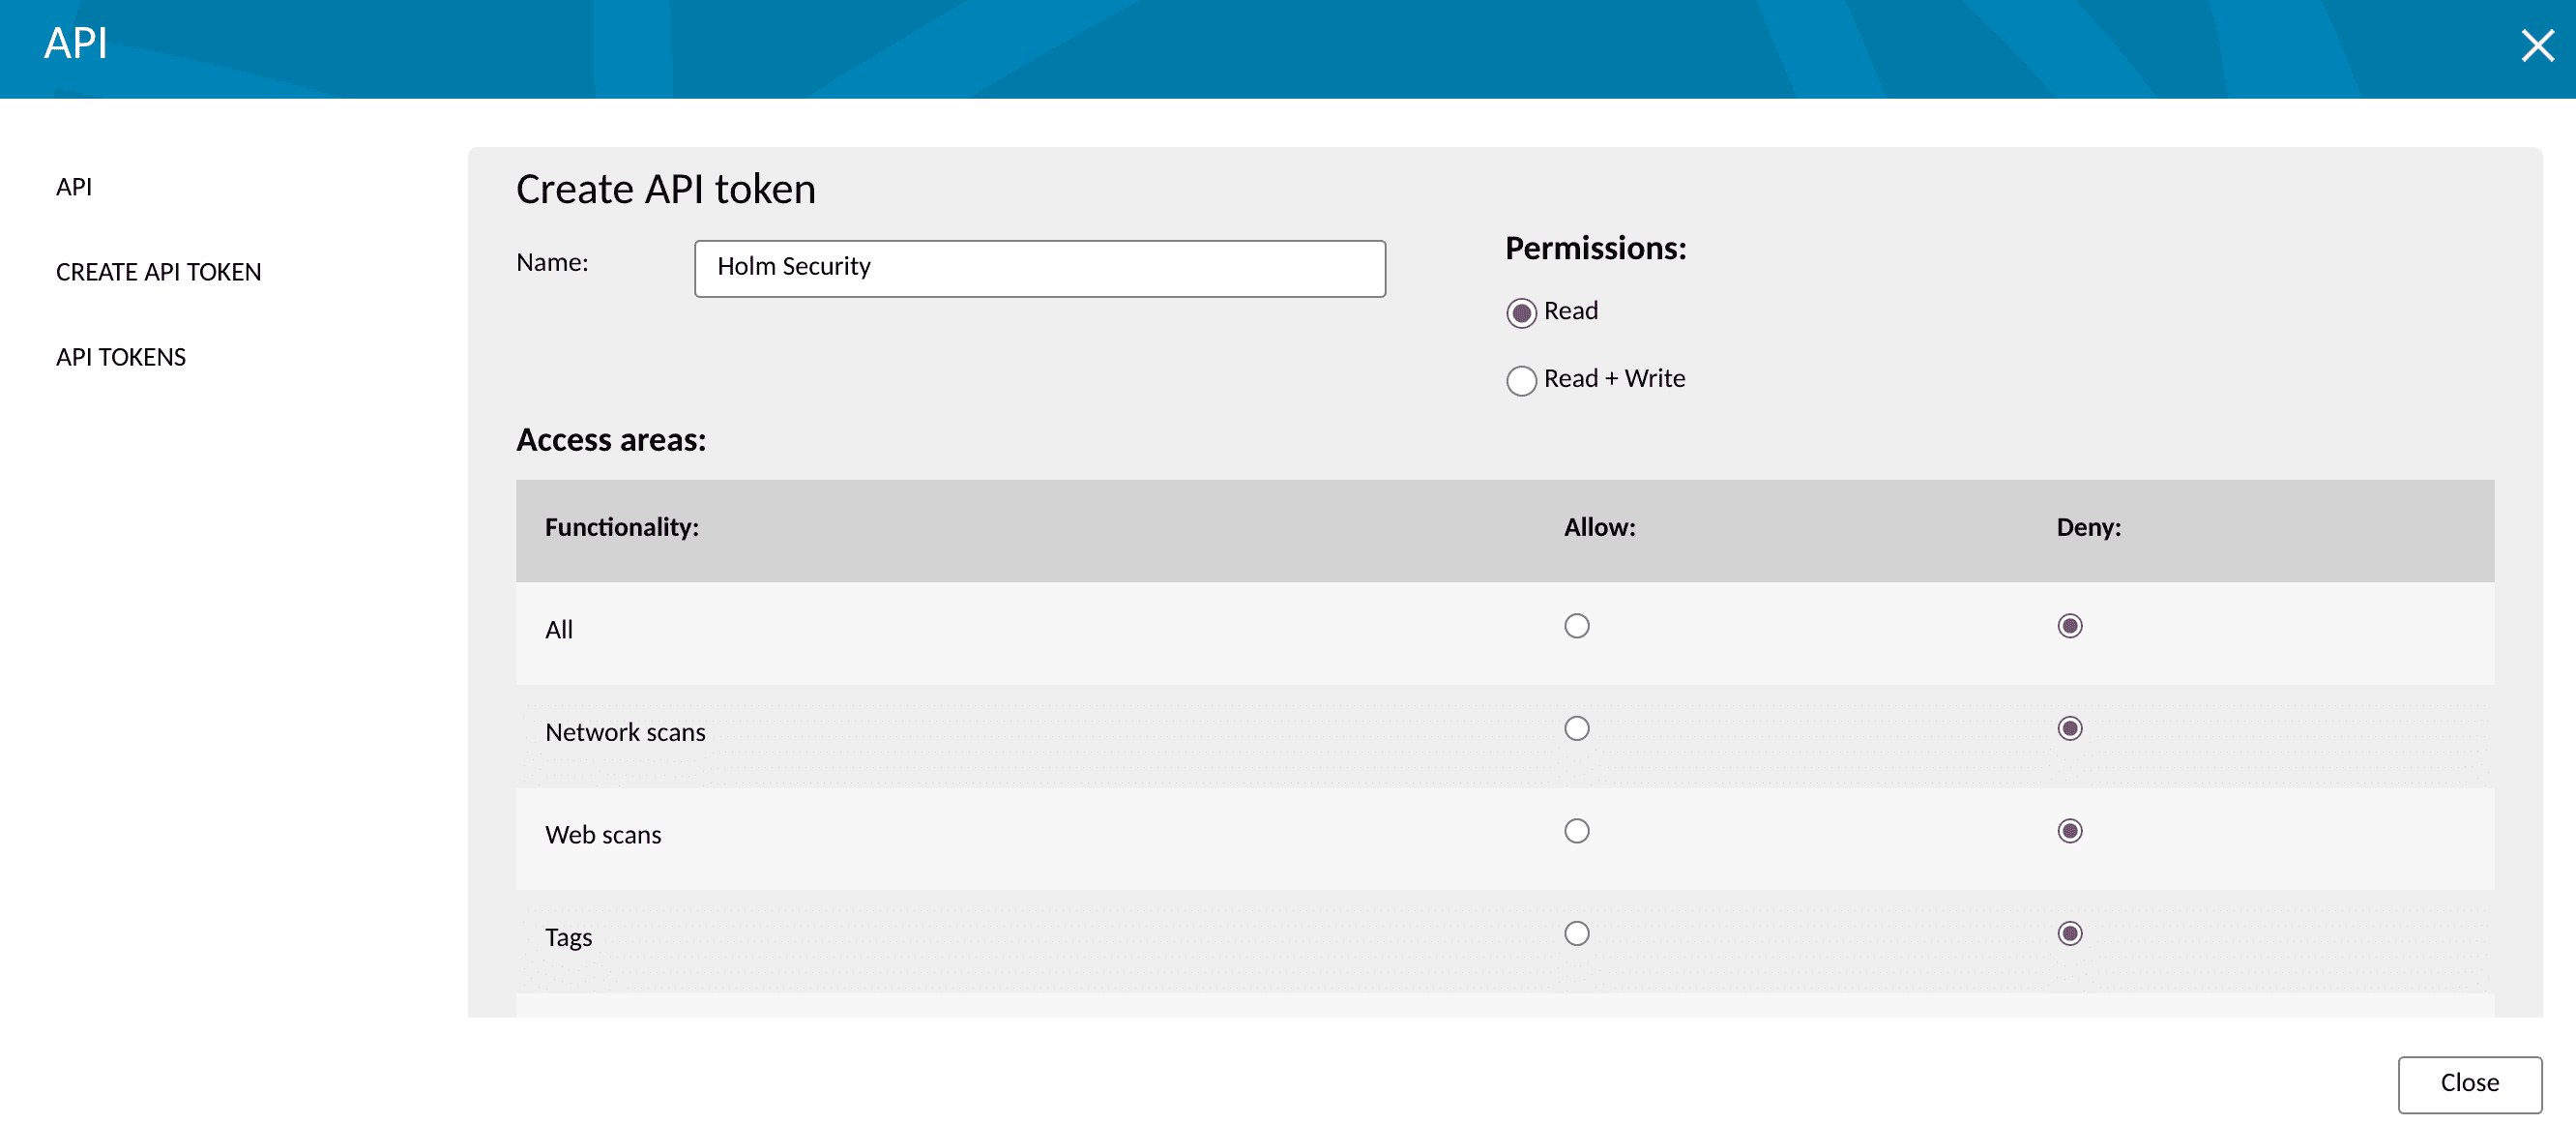
Create API Token
Click API TOKENS. You can find the API Token under API Tokens.
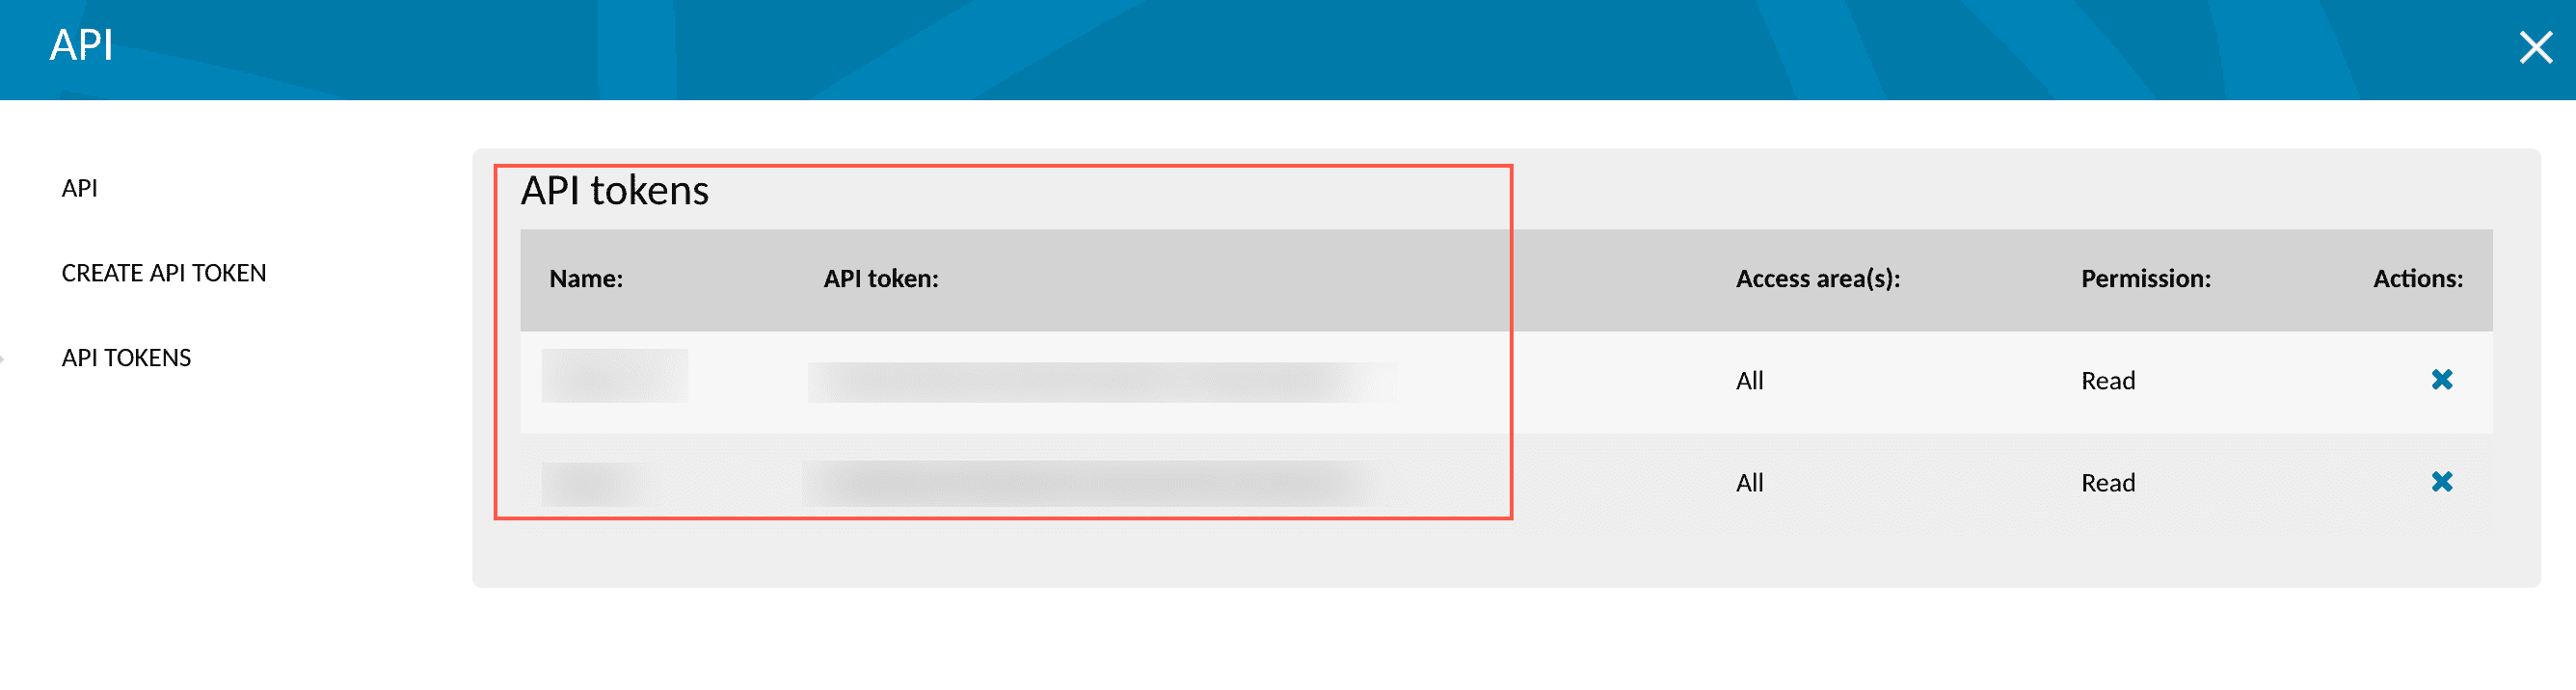
Holm Security API Token
Go to Settings >> Configuration from the navigation bar and click Devices.
Click the Add Collectors/Fetchers () icon from Actions of the localhost device.
Adding Fetchers in a Device
Click Vulnerability Management.
Select Holm Security Fetcher.
Click Add.
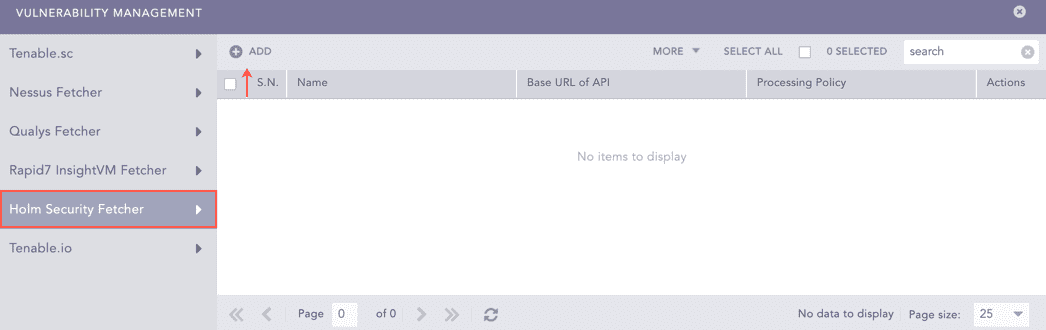
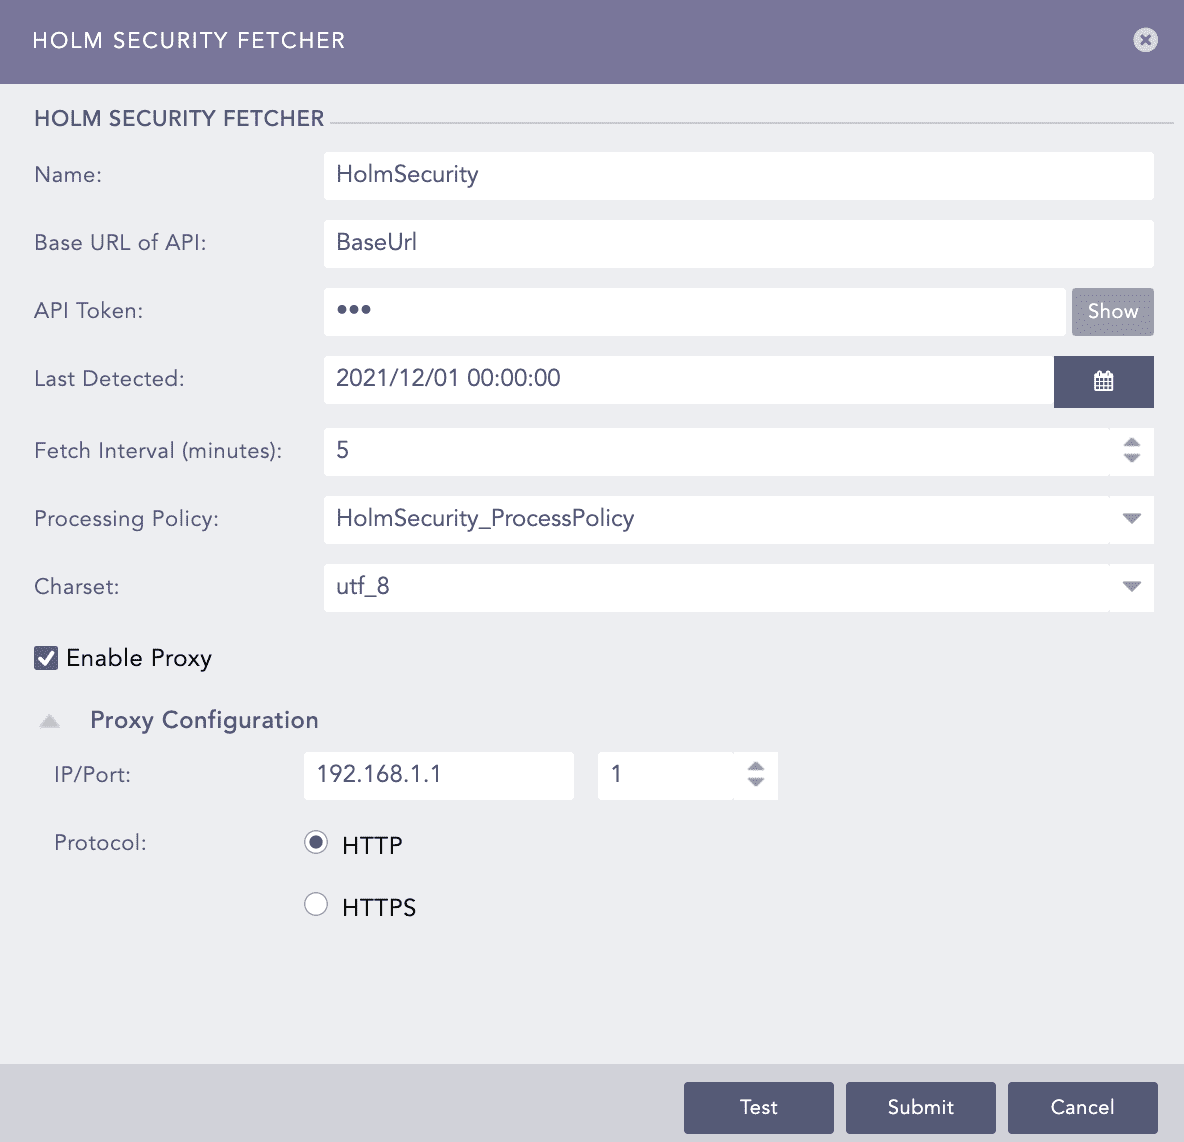
Vulnerability Management
Enter a Name for the configuration.
Enter the Holm Security Base URL of API and API Token.
Select the Last Detected date. Logs are fetched from this date.
Select the Fetch Interval in minutes.
Select the Processing Policy and Charset.
Click Test to check whether the fetcher configuration is working correctly.
Select Enable Proxy to use a proxy server.
In Proxy Configuration:
13.1. Enter the proxy server IP address and the Port number.
13.2. Select either HTTP or HTTPS protocol.
Click Submit.
Configuring Holm Security Fetcher
To configure the Tenable.io Fetcher in Logpoint, you must first obtain the access key and secret key from the Tenable.io portal.
Go to the Tenable.io Portal and enter your credentials.
Click the Profile icon and click My Account.
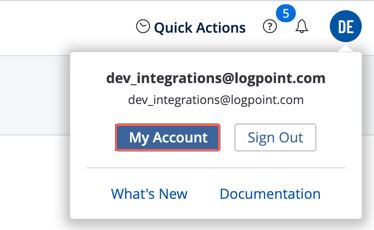
Tenable.io Account
Click API KEYS.
Click Generate and the Access Key and Secret Key will be generated.
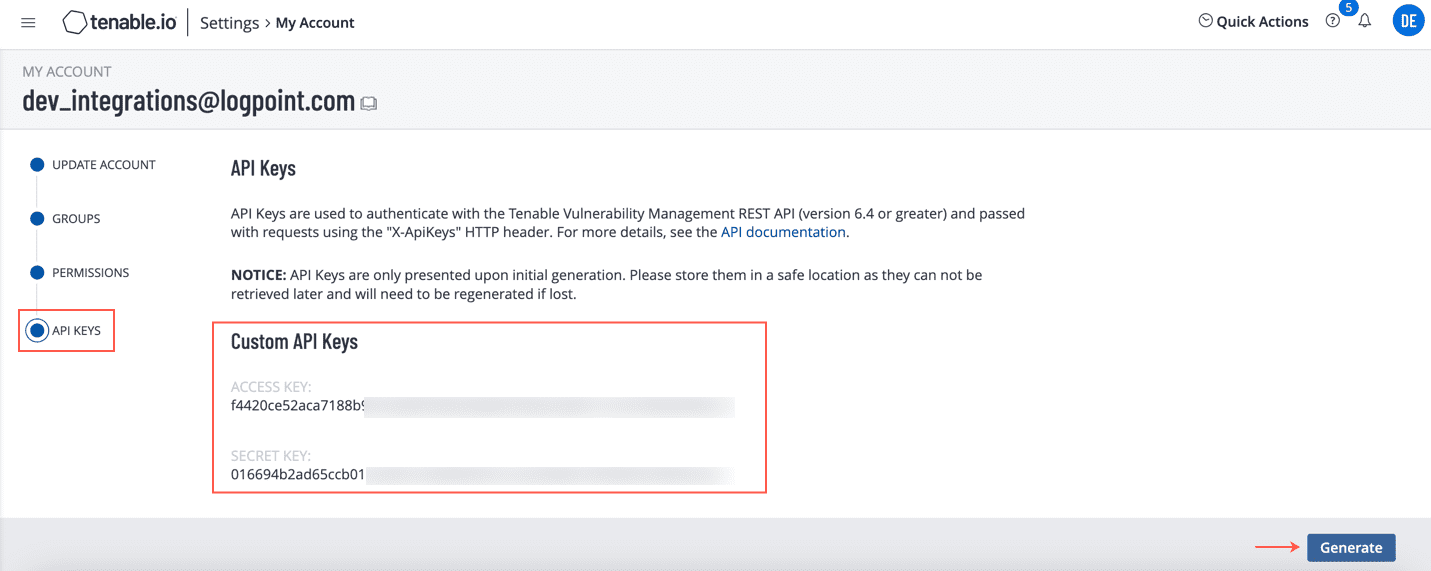
Tenable.io API Keys
Go to Settings >> Configuration from the navigation bar and click Devices.
Click the Add Collectors/Fetchers () icon from Actions of the localhost device.
Adding Fetchers in a Device
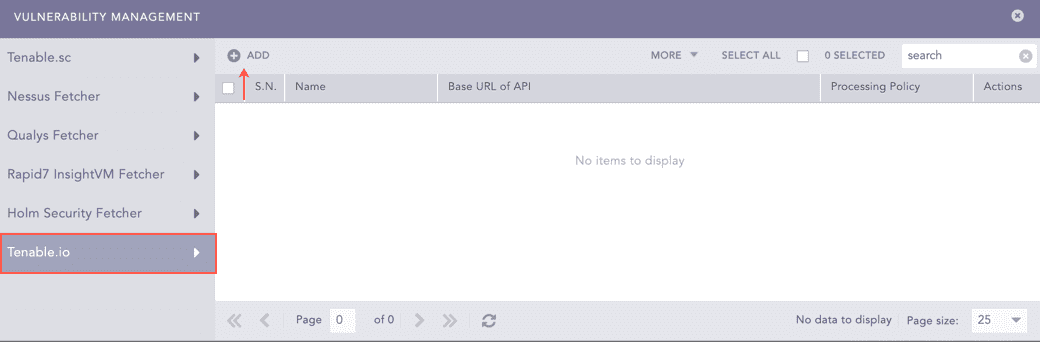
Click Vulnerability Management.
Select Tenable.io.
Click Add.
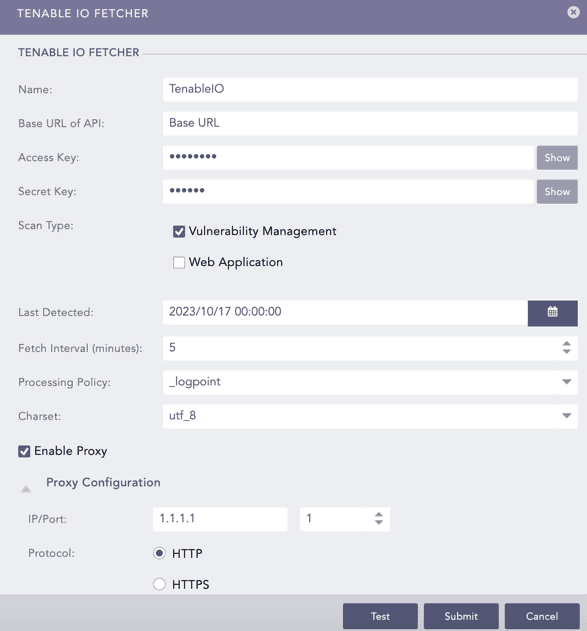
Vulnerability Management
Enter the Tenable.io Base URL of API. It is the URL used to access Tenable.io. For example, https://cloud.tenable.com.
Enter the Tenable.io Access Key and Secret Key.
Select a Scan Type. Vulnerability Management fetches scan reports of the selected scan type.
Select the Last Detected date. Logs are fetched from this date.
Enter the Fetch Interval in minutes.
Select a Processing Policy.
Select a Charset.
Click Test to check whether the fetcher configuration is working correctly.
Select Enable Proxy to use a proxy server.
In Proxy Configuration:
12.1. Enter the proxy server IP address and the Port number.
12.2. Select either HTTP or HTTPS protocol.
Click Submit.
Configuring Tenable.io Fetcher